THE 10 – POINT WAY TO HEALTH
“Prevention is Better Than Cure!” We have all heard this expression.
The book “The Ten Point Way to Health” was first published in 1938, but the philosophy and exercise sequence was developed many years before.
The series of exercises were developed in India and called “Surya Namaskars”, first published in 1928.
The great advantage of these exercises and the most important element of correct breathing during each sequence, is that they do not strain any part of the body, or over-develop some muscles at the expense of others, but they rather search out every cell and sinew, rousing them, and tuning them into complete harmony.
In addition, it has been used as a refreshing tonic after participating in a hard sporting event to prevent soreness and general fatigue. An important by-product was the positive affect it had on the nervous system by removing all traces of uneasiness and clearing the brain.
There are no short cuts or one specific for good health. Some sort of persistent effort is required on the part of the individual for him or her, young or old, to grow strong and healthy, and to maintain and remain in good condition.
Long overdue and critical to all societies is the need for a scientific and systematic form of physical exercise for the development of young youthful bodies. “The 10 Point Way to Health” routine should be promoted not only to the post-teen generation but by way of enforcement upon the younger generation in schools, colleges and universities. By creating healthy habits aimed at the youth we will be assured of healthy generations well in to the future.
Children do not form habits from theory. They acquire and adopt habits of healthy living through being trained to perform the physical actions as a matter of regular routine and upon which good health depends.
However, what cannot be emphasized enough is that it is never too late to begin, even in a much more moderate form. The avoidance and reduction in numerous afflictions will follow participation in the right type of exercise.
If there is one universal kind of exercise that could benefit all ages, for children, teenagers, men and women, at no cost and without the need for equipment or accessories – this could be it.
Some may be inclined to view the routine as some form of religious faith. Nothing could be further from the truth. The plan covers essentials like breathing, flexibility, mobility, balance and strength, whilst removing stress.
Many would agree with this definition of an ideal exercise –
“It should not only develop limbs, muscles, provide for anaerobic and aerobic conditioning, as well as benefit internal organs of the body; it should also promote mental development. In order to make such an exercise universally acceptable and popular there should be no necessity for apparatus; it should be easy to do; it should take a short time to perform; it should be able to be carried out anywhere and by anybody; and it should not require a partner or companion. “The 10 Point Way to Health” fills all these requirements.”
The promoters of Surya Namaskars claim that it renders the following capable of resisting disease and other ailments:
- The Digestive System – An appalling number of people suffer from stomach and intestinal disorders which can result in liver problems, dropsy, piles, diabetes and many others;
- Heart & Lungs – Colds, coughs, asthma, palpitations and a list of others are symptoms of heart and lung derangement;
- The Nervous System, including the brain and spinal cord – Headaches, memory loss and balance. Ailments of the spinal cord include paralysis, myelitis, sclerosis and fatigue after even slight exertion, depression, poor circulation in the hands and feet and disturbed sleep.
The Program:
1.Children between the age of 8 to 12 years, in normal health, should do from 25 to 50 repetitions 5 times per week;
2.Age 12 – 16 years should perform 50 – 100 repetitions 5 times per week;
3.Age 17 and above should perform up to 300 repetitions 5 times per week, depending on their fitness level;
4.Age 60 plus should do as many as their ability allows.
Always remember the basic rule of any exercise – To obtain long-term benefits it should be done regularly, continuously and in proportion to one’s strength and ability.
IMPORTANT NOTE:
- You must consult your Doctor and obtain his approval that your physical condition allows you to participate in an exercise program;
- Although the illustrations of the exercises may look easy to do, they are in fact difficult to perfect. It will take you at least a month or more before you are ready to put all 10 positions together into a single cycle;
- Don’t try to over-achieve. Listen to your body and rest as necessary during and after the session. By so doing, you should feel fresh, invigorated and in a good mood after each session;
- Five to ten minutes a day at the start will be more than sufficient. Don’t over-exert to get into positions that are beyond your ability or comfort zone;
- Make a note of your personal measurements such as: height, weight (stripped if possible), chest expanded and deflated, waist at the navel, hips, thighs and calves at the mid-point, middle of a flexed bicep and the ankle. Repeat the measurements after every 3 months;
- Place a cloth in front of the toes as illustrated and use a mat for the feet and back extensions if the floor is slippery;
- Correct Breathing –
a. An integral and important part of the routine. Most people lose the true art and benefit of correct breathing as a young child and never regain this most critical element to good health. (Link to 2 Breathing Articles). Like any exercise, Surya Namaskars would lose half of its benefit.
b. There are 3 full breaths – 3 full inhalations - holding of the breath - and 3 complete exhalations, to each circuit of one Namaskar. When doing more than one circuit, the 4th breath, taken in at the 10th position is the 1st breath in the 1st position of the next circuit. It is recommended that you practice this breathing sequence even when not performing the circuits – while standing, sitting or walking.
8. Explanations on each of the 10 Positions:
Position # (1): Wear as little loose clothing as possible. Stand with feet & knees together with toes touching the edge of the cloth. Join hands resting on the chest and palms firmly together. Raise the chest and pull the abdomen in & up as far as possible. Stand erect while stiffening the whole body from the feet up especially the waist and back. Don’t raise the shoulders. You will become aware of virtually every muscle in the body. Inhale as you stiffen and hold your breath – This is BREATH # ONE. When and if you feel any strain whilst doing any of the movements, it is recommended that your return to Position # 1 and do only this one movement for a few days.
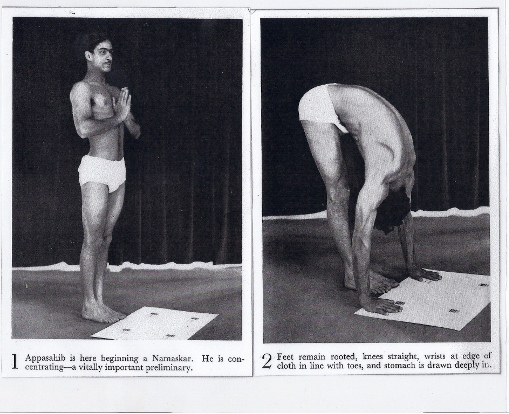
Picture #1: The beginning of the Namaskars. Concentration is vital.
Position #2: Keeping the knees as straight as possible, drop your hands to the floor, placing them so that the wrists are in line with the toes. As you do so, EXHALE COMPLETELY. This is the end of BREATH # 1. If you are unable to place your hands flat on the floor, bend the knees until you can. On bending, try to touch the knees with your forehead or nose. Squeezing in the Abs will help. Don’t over-strain – GIVE YOUR SELF THE TIME NEEDED TO BECOME MORE FLEXIBLE.
Picture # 2: Feet remain rooted, knees straight, wrists at edge of the cloth in line with the toes, and stomach is drawn in deeply.
Position #3 :Your hands remain on the floor in the start position until Position # 10. INHALE deeply and hold for BREATH # 2. Without bending you arms, drop to your right knee whilst lifting your head as high as you can, looking up and back. Touch the floor with knee and toes, whilst the other knee juts ahead of the vertical arm. Press your thigh as hard as possible into the side. Keep holding your breath. Drop onto the right knee on the first circuit and on the left knee for the second circuit. And so on alternatively.
Note: Spleen & Liver Problems – Using the above, the left thigh exerts pressure on the spleen and the right thigh on the liver. If either is out-of-order, it is advisable to reverse the leg bends without alternating until the discomfort is removed.
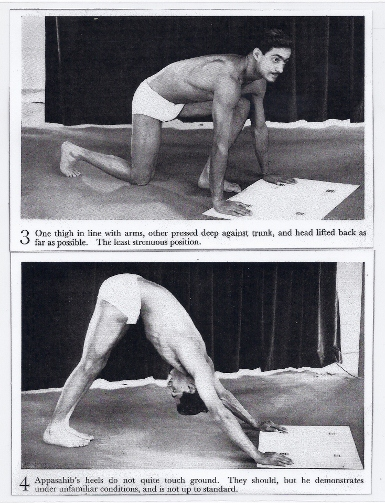
Picture#3: Move one leg back and bend at the knee. The other remains in position but the knee is bent and presses in to the left side of the chest. Lift the head back as far as possible.
Position#4:Still holding BREATH # 2, with hands remaining in place, raise your body whilst placing the front leg backwards to meet the rear foot. Bend your head forward in to the neck. Your body should be in an inverted V. The muscles and tendons behind the knees and ankles may feel like they are going to snap. Don’t force yourself in to any “more than comfortable” position. For example, forcing the heels flat on the floor. You may start to feel muscles that you did not know existed.
Picture#4: Move the front leg back to meet the other leg. Heels should ( in time) be on the floor. Hands remain in position and head is tucked in as far as possible. Arms & back are as straight as possible.
Position #5: Keeping your hands rooted, drop flat on to the floor with the forehead, chest, knees, toes touching the floor, but NOT the nose, hips and abdomen. The hips and abdomen should be lifted as much off the floor as possible. The whole body above the knees is supported by hands, wrists and forearms. EXHALE BREATH # 2.
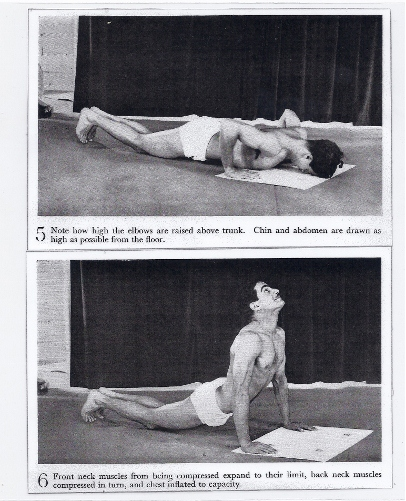
Picture #5: Lie face down with forehead on the cloth. Chin & abdomen are pulled in as far as possible. Hands still flat on the floor.
Position #6: Keeping the hands, toes and knees as in # 5 above, straighten the arms and INHALE BREATH # 3. Throw your chest forward as far as possible, curve the lower back and look up at the ceiling whilst stretching the head back as far as possible. Hold your breath until Position # 9 when you exhale. Rising from Position # 9 to Position # 10, you INHALE BREATH # 4, which will count as BREATH # 1 of the second cycle.
Picture #6: Press up with the arms but don’t lift the hips. The front neck muscles will expand to their limit by extending the head back, whilst the back neck muscles will be compressed and the chest inflated to capacity.
Position #7: Still holding your BREATH – the longest inhalation in the series – you now commence the balance of the positions in reverse order.
Still holding BREATH #3, with hands remaining in place, raise your body whilst placing the front leg backwards to meet the rear foot. Bend your head forward in to the neck. Your body should be in an inverted V. Again, don’t force yourself in to any “more than comfortable” position, for example, forcing the heels flat on the floor.
Position #7 = Position #4
Position #8 = Position #3
Position #9 = Position #2
Position #10 = Position #1.
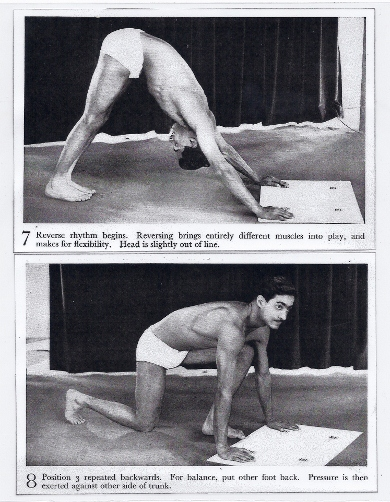
Picture #7: The reverse stages now begin. Reversing each of the first 4 movements will bring different muscles in to play, which promotes flexibility. If needed, refer to notes on Picture #4 above.
Position #8:Your hands remain on the floor in the start position until Position #10. Still holding BREATH #3. Without bending you arms, move and bend your left leg so that the knee is under the upper chest as in Position #3, whilst lifting your head as high as you can, looking up and back.Touch the floor with knee and toes, whilst the other knee juts ahead of the vertical arm. Press your thigh as hard as possible into the side.Keep holding your breath.
Picture #8: This is the same as Position & Picture #3. To improve balance, you can place the opposite leg forward which will place pressure on the other side of the chest.
Position #9: EXHALE COMPLETELY. This is the end of BREATH # 3. Bring the rear bent leg up to the front leg with knees and feet together. Straighten at the knees as much as possible with the head bent forward in to the throat. Keep the knees as straight as possible; keep your hands on the floor.
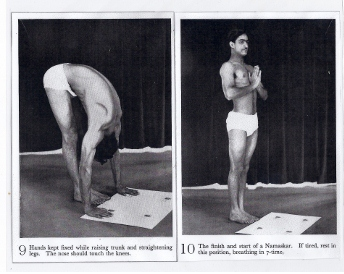
Picture #9Try to keep the hands flat on the floor, or as best your can whilst straightening the legs.
Position #10:Stand erect as possible while stiffening the whole body from the feet up especially the waist and back as in Position # 1. Don’t raise the shoulders.
Picture #10:You have reached the Finish and the Start of the next Namaskar. IF YOU FEEL FOR A SHORT REST, HOLD THE POSITION AND DO SOME DEEP BREATHING – INHALE TTHROUGH THE NOSE, HOLD FOR A FEW SECONDS AND THEN EXHALE THROUGH THE MOUTH.
The table below will help summarize the positions and the breathing:
(1) Stand erect 1st Breath INHALE IN
(2) Double over1st Breath EXHALE OUT
(3) Right leg back 2nd Breath INHALE IN
(4) Inverted VHold the 2nd Breath
(5) Flat on the floorEXHALE 2nd BREATH OUT
(6) Trunk raised 3rd Breath INHALE IN
(7) Back to Inverted V Hold the 3rd Breath
(8) Return the left leg Hold the 3rd Breath
(9) Double over as in (2) - EXHALE 3rd BREATH OUT
(10) Stand erect as in (1) - 1st Breath INHALE IN
A single – one complete cycle of 10 positions, can be done by an expert in 20 seconds. The recommendation for BEGINNERS is 15 sets in 5 minutes – say 20 seconds per set. In 6 months the aim should be to reach 40 sets in 10 minutes. However this is a guide and if this number is not achieved – no matter what age group you fall into – it is not serious.
Don’t rush the sets. Try for 10 minutes a day at least 4 times per week. Concentrate to the exclusion of all else. Work on doing each stage as best as possible, even if you start off by repeating them over and over. You will find that suddenly it will all come together naturally.
The following benefits are universally regarded as being the key to promoting strong, healthy and flexible bodies for all age groups;
- A strong & healthy Spine with good Posture;
- A strong Back from top to bottom;
- A strong Abdominal section – the Core of the body;
- Colon cleanliness;
- Joint Flexibility;
- Absence of excess fat and/or Obesity;
- Active healthy Skin;
- A Youthful Spirit – a “Man/Woman is as young as he/she Feels.”
Namaskars in the Schools.
Namaskars is easily adapted for group or mass participation for girls and boys, without experiencing any discomfort or embarrassment. The only equipment needed is a small piece of cloth.
Namaskars are also particularly beneficial before or after games or sports.
COPYRIGHT:
Correspondence with Orion publishing:
I have reviewed what records we have and unfortunately I cannot find anything that refers to this title. As a result, due to lack of sufficient information in our records, we can neither grant nor refuse permission for you to include material from this title as a part of your website.
Should you decide to include the material in your website we would request that you acknowledge the title of the book, the author and JM Dent as the Publishers and include in your publication words to the effect that all your attempts at tracing the copyright holder of The Ten Point Way to Health by Shrimant Balasahib Pandit Pratinidhi, B A The Rajah of Aundh were unsuccessful.
Thank you and best wishes,
Paul Stark Rights Assistant
The Orion Publishing Group Phone - 0207 5204373 Fax - 0207 8364266